1. Fitting New Tyres
In general, the Regulations require that tyres of the same construction should be fitted on the same axle. Fitting tyres with different tread patterns is tolerated provided they: have sufficient load capacity for the plated weights of the vehicle axle; are the same size; are the same structure (radial or diagonal) and have sufficient speed capacity.
However, for optimised tyre performance YUELONG recommends fitting tyres with the same tread pattern on the same axle. If this is not possible, YUELONG advises mounting twinned tyres of the same type. For certain tyres, YUELONG issues Technical Bulletins indicating in what configurations they can be mixed and fitted.
(a) The installment of tires must be under professional staff, and used specialized tools. Radial and tubeless tires should be fixed under specialized disassem- ble and assemble machine to avoid damage to the tire.
(b) The tire’s components must be standard and matchable; the anamorphic or unstandardized rims prone to cause tire’s abnormal wear and bead burst.
(c) When installing the tires with directional tread pattern, one must ensure the right driving direction.
(d) During the installment, there should be no debris, sand or water between the inner and outer tire; one can only scatter some talcum powder on the surface of the inner tube, but cannot spread talcum powder to tire directly.
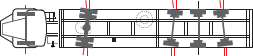
(e) In the same axle, one cannot mix radial tire with bias tires, and had better use the same brand, same size, and same ply; Tires with a little larger outer diame- ter should fixed on the outside of the vehicle.
YUELONG recommend that its tyres should only be mixed on the same axle if:
(a)The retreaded and new tyres are YUELONG;
(b) The makes of the casings are the same (new and retread);
(c) The following technical characteristics of the retreaded and new tyres on the same axle are identical: otyre dimensions, structure (radial or diagonal), speed rating and load indexes, tread type (road, all-terrain, snow–M+S marking).
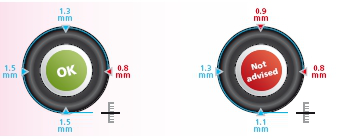
If the axle is not parallel, it will result in the fast wear of tire’s one or more than one wheel position. Vehicles that happened traffic accident, axle becomes curved, axle changed, or the fixed part of the shaft is loosen must be inspected axle’s parallelism, when necessary, the axle must be corrected.

Every 1mm toe in causes about 7% mileage loss
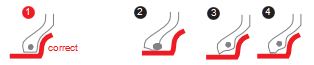
The tire bead will be deformed when it is mounted on biased position on the rim.
One should select the standard rim, ensure a reasonable installation, finalize the design for twice, so that the tire bead and rims coincide, otherwise it will lead to the bead installed in the incorrect position, thus affecting the tireless tires’ gas-tightness and causing balance error between tire and rim combination, and also affecting the handling and stability performance.
Location is not correct A variety of deformation
1.1Fitting of Tubeless Tir

Step 1 Coat the special lubricant evenly on the rim, bead and the edge of the rim.
Step 2 Bridge the beads on both side of the tire over the installation bracket, use the assemble and disassemble machine to rotate the rim, at the same time, use the professional pry bar to put the two sides of beads fully into the rim.
Step 3 Remove the valve core, and fill the appropriate compressed air. Make sure that all parts are fully installed and properly fitted with the valve core.
Step 4 Test the dynamic balance of the tires and the rims assemblies; and add a corresponding counter weigh to light point of the rim.
Step 5 Check the assembly condition of the tires and rims to ensure proper installation of all parts and ensure the safety of the inflation.
Precautions:
Before installing, check whether the rims are deformed or cracked. If any problems found, one need to repair or replace the rims. When installing the tire, one should remove the rust and other debris from the rim surface, bead base and the "O" type grooves.
When assemble or disassemble the tires with “O” type rim, one need to change the new “O” type bead. Before installing the tire, one need to check if any obstacles of the “O” type bead, and coat with lubricant.
When assemble or disassemble the tire, one should use assemble and disassemble machine, and should not pry hard, smash hard or damage the sealing layer of the tire and the bead. For ease of installation, neutral liqueur or special lubricants can be applied to coat on the bottom of the bead and the rim’s ring seat, and should not use grease or other lubricants that may affect the quality of the tire.
For the tubeless OTR tires that fitted with steel band, one should first install the tire on the rim, and then inflate about 150KPa pressure, and finally cut and remove the steel band.
1.2 Fitting of Tube Tire

Step 1 When installing the inner tube into the outer tire, the debris from the tire cavity and the inner surface of the tire should be removed. It is recommended that dry and fine grinding talc or graphite powder should be coated evenly in the outer tire’s inner wall, inner tube and the surface of the protecting band.
Step 2 When folding the inner tube and putting it into the outer tire, the valve stem should face up. Open the inner tube and flatten it into the outer tire, and then remove the valve cover of the inner tube.
Step 3 Check whether the mounting position of the protecting band is normal or not. Set the protecting band into the gap between the inner tube and the outer tire smoothly; and make sure that the edge of the protecting band is not wrinkled or folded.
Step 4 Coat the non-corrosive substanc- es lubricate evenly on the tire's bead. Mount the tire on the rim and the valve fitted into the rim’s valve slot.
Step 5 Insert the retaining ring (i.e., the compression ring) into the slot.
Step 7 Confirm that all components are fully installed once again, filled the tire with compressed air to standard pressure. The rim lines on the sidewalls should all be exposed outside the rims. Install the valve core correctly.
Step 6 Make sure all components are properly installed and matched with each other; Take the valve core out of the inner tire, fill it with about 50% of standard pressure of compressed air, and then use a mallet to beat the sidewall circumference of the tire, so that the tire and the rim can match with each other more closely.
Precautions:
Tires must be mounted on the standard rims, and the rim cannot be deformed, rusted, out of round, cracked, leaked solder and burnt, uneven weld or loose on thorns, sharp edges or other phenomena.
The same axle should be fitted with the tire of same size, same structure, same brand, same ply rating, and same pattern.
When installing the tire with directional tread pattern, one should ensure that the directional mark be in accordance with the driving direction of vehicle.
When installing the new tire, one should try to change the whole vehicle or the coaxial tires. When assembling or dissembling the tube tires, one should use special tools or equipment.
When assembling or dissembling the tube tires, one should use special tools or equipment.
2. Tread Wear Indicator
When the tread pattern almost wears out, that is, the tread pattern left below 2mm, the amount of slippage of the tire will significantly increase, and the braking distance will increase dramatically, which not only makes the operation stability of the vehicle deteriorate, but also often causes traffic accidents. Therefore, as our country’s national standard regulated, trucks and passenger cars of radial tires’ wear limit is 2.0mm; tire manufacturer should make tread wear indicator on tires under the standard; when tires’ tread pattern reaches the above limit, drivers should change the tire in time.

When reached the tread wear indicator, Crown Wear Indicator on the tire’s shoulder, the “TWI” marks
it shows the tire’s handling and safety At the bottom of the tread grooves the position of the wear indicator.
performance cannot be guaranteed, , there are 4 or more than 4 indicator
and must be replaced in time. blocks which locally uplifted
2.1 Serious Situation
It is stipulated that a pneumatic tyre shall not be used on the road if:
(a) the tyre has a cut in excess of 25 mm or 10% of the section width of the tyre, whichever is the greater; measured in any direction on the outside of the tyre and deep enough to reach the ply or cord;
(b) the tyre has any lump, bulge or tear caused by separation or partial failure of its structure;
(c) the tyre has any of the ply or cord exposed;
(d) the tyre has any of the ply or cord exposed。
(e) the grooves of the tread pattern of the tyre do not have a depth of at least 1 mm throughout a continuous band measuring at least three-quarters of the breadth of the tread and round the entire outer circumference of the tyre;
(f) if the grooves of the original tread pattern did not extend beyond three-quarters of the breadth of the tread, any groove which showed in the original tread pattern does not have a depth of at least 1 mm;
(g) the tyre is not maintained in such condition as to be fit for the use to which the vehicle or trailer is being put or has a defect which might in any way cause damage to the surface of the road or damage to persons on or in the vehicle or to other persons using the road.
2.2 Inspecting For Wear And Tear
(a) Inspecting for wear and tear must always be done at several points on the tyre. The inspection can be carried out using a tread depth gauge or by observing the wear indicators on the tread pattern indicated by a symbol on the sidewall (if present).
(b) If the legal or technical limits for wear have been reached, the tyre must be removed and replaced. Please refer to relevant country legislation.
(c) Consult a qualified tyre professional in the case of abnormal or uneven wear of tyres fitted on the same axle.
3. Safe Driving For Tires
(a) The new tires also have a wear period during use, which generally is about 200kms.
(b) After a certain time (usually 1-2 hours) driving at a high speed, drivers should have a rest, and check the ties.
(c) Avoid sudden start, brakes, or sharp turn. Prevent overloading or speeding.
(d) Drive slowly on poor road to avoid the severe impact of tires. Retreaded tires are forbidden to use on front wheels.
(e) When tire worn to the tread wear indicator, it must be replaced. When tire occurs failure, it should be replaced immediately.